Started to work on SharePoint 2010 ...completed the first step- cleared MCTS 70-667.
Will push the content now.
Sunday, 16 January 2011
Wednesday, 3 February 2010
Data View Web Part- Update the List
I got a requirement in which the client manager want to present the user with a contactform. And want to track the submitted data in the portal. And the main requirement is to use Out of Box features without much delay and with branding imposed.Then I prefered to use data view web part to achieve this solution in less than 1 hour.
Steps to achieve this quick solution.
1) Open the page in Sharepoint designer
2) Click on Insert->Sharepoint Controls->Data View web part to the page.
3) Data source library would be displayed(if not displayed, choose from Task Panes)
4) Select the required "List Name" from the displayed data sources, as shown here
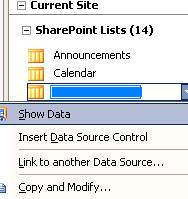
5) Click on "Show data" in the context menu displayed when right-clicked on the "List Name"
6) Fields and their data would be displayed in the column "Current Data source"
7) Highlight Rows
8) Click on the "Insert Selected Fields as" to display dropdown.
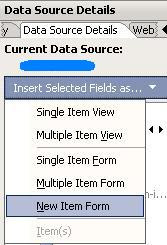
9) Click on "New Item form"
10) Automatically SharePoint Designer embeds the field controls with their field name.
11) Save the page & publish changes
12) Navigate to the page in Browser and test it
Some more customizations
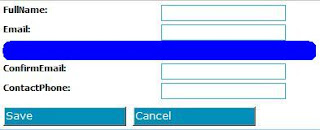
1) I created a list which has four columns (FullName(text), Contact(text), Email(text), Phone(text))
2) Inserted the data view web part as detailed in above steps.
3) Now after step 10, Right click on the text controls generated for more options
4) Choose as text box.
Or replace the entire line of
<sharepoint:formfield runat="server"....
with
<asp:TextBox runat="server" id="ff1{$Pos}" __designer:bind="{ddwrt:DataBind('i',concat('ff1',$Pos),'Text','TextChanged','ID',ddwrt:EscapeDelims(string(@ID)),'@Title')}" BorderColor="#25a5cc" BorderStyle="Solid" BorderWidth="1px" />
5) Save the changes and refresh the browser, then we can see the excellent form control which would update the data into the list
6) And we can even regular asp validator controls to validate and impose the mandatory field checks. This can also be achieved by making that field compulsary in List
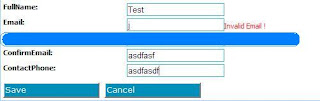
7) To check whether the email field has a valid email address, add the following line after the Email field control
<asp:RegularExpressionValidator runat="server" ErrorMessage="Invalid Email !" id="RegularExpressionValidator1" ControlToValidate="ff2{$Pos}" ValidationExpression="\w+([-+.']\w+)*@\w+([-.]\w+)*\.\w+([-.]\w+)*" />
* You can customize the errormessage also.
8) Now save the changes and refresh the browser to see the result.
9) On entering the in correct data, the Email field throws the error message and prevents user from saving the data.
Cheers! Am done.
Enjoy SPD'ing
**************************************************************************************
Refer this link for displaying the list data in the data view web part
Steps to achieve this quick solution.
1) Open the page in Sharepoint designer
2) Click on Insert->Sharepoint Controls->Data View web part to the page.
3) Data source library would be displayed(if not displayed, choose from Task Panes)
4) Select the required "List Name" from the displayed data sources, as shown here

5) Click on "Show data" in the context menu displayed when right-clicked on the "List Name"
6) Fields and their data would be displayed in the column "Current Data source"
7) Highlight Rows
8) Click on the "Insert Selected Fields as" to display dropdown.

9) Click on "New Item form"
10) Automatically SharePoint Designer embeds the field controls with their field name.
11) Save the page & publish changes
12) Navigate to the page in Browser and test it
Some more customizations
1) I created a list which has four columns (FullName(text), Contact(text), Email(text), Phone(text))
2) Inserted the data view web part as detailed in above steps.
3) Now after step 10, Right click on the text controls generated for more options
4) Choose as text box.
Or replace the entire line of
<sharepoint:formfield runat="server"....
with
<asp:TextBox runat="server" id="ff1{$Pos}" __designer:bind="{ddwrt:DataBind('i',concat('ff1',$Pos),'Text','TextChanged','ID',ddwrt:EscapeDelims(string(@ID)),'@Title')}" BorderColor="#25a5cc" BorderStyle="Solid" BorderWidth="1px" />
5) Save the changes and refresh the browser, then we can see the excellent form control which would update the data into the list

6) And we can even regular asp validator controls to validate and impose the mandatory field checks. This can also be achieved by making that field compulsary in List
7) To check whether the email field has a valid email address, add the following line after the Email field control
<asp:RegularExpressionValidator runat="server" ErrorMessage="Invalid Email !" id="RegularExpressionValidator1" ControlToValidate="ff2{$Pos}" ValidationExpression="\w+([-+.']\w+)*@\w+([-.]\w+)*\.\w+([-.]\w+)*" />
* You can customize the errormessage also.
8) Now save the changes and refresh the browser to see the result.
9) On entering the in correct data, the Email field throws the error message and prevents user from saving the data.

Cheers! Am done.
Enjoy SPD'ing
**************************************************************************************
Refer this link for displaying the list data in the data view web part
Monday, 25 January 2010
Common Errors with SharePoint and their Solutions
I thought to create a ground for listing out most of the MOSS errors I have encountered and their solutions, so that they might be useful to some of the MOSS developer buddies.
And this list would be appended as I encounter the issues and their resolutions.
************************************************************************************************
#1)Connecting the Portal with sharepoint designer
The first error I encountered when trying to open the Portal using Sharepoint Designer is as follows:
"The Folder xxxxxx isint accessible. The folder might be located in unavailable location,protected with a password, or the file name contains a/ or \".
After struggling with issue for a while, I found that there are a quite a few locations in Central Administration which will help us to resolve this error.
1) Log into Central Administration
2) Navigate to Applications -- > Application Security -- User permissions for Web Applications.
3) Select this option
"Use Remote Interfaces - Use SOAP, Web DAV, or SharePoint Designer interfaces to access the Web site"
3) Navigate to Applications-- > Application Security -- Authentication Providers
4) Choose the appropriate zone and click on that
5) Choose "YES" for Enable Client Integration
It did the trick and after that am able to connect to the portal with SPD without any issues.
************************************************************************************************
And this list would be appended as I encounter the issues and their resolutions.
************************************************************************************************
#1)Connecting the Portal with sharepoint designer
The first error I encountered when trying to open the Portal using Sharepoint Designer is as follows:
"The Folder xxxxxx isint accessible. The folder might be located in unavailable location,protected with a password, or the file name contains a/ or \".
After struggling with issue for a while, I found that there are a quite a few locations in Central Administration which will help us to resolve this error.
- Steps Of resolution:
1) Log into Central Administration
2) Navigate to Applications -- > Application Security -- User permissions for Web Applications.
3) Select this option
"Use Remote Interfaces - Use SOAP, Web DAV, or SharePoint Designer interfaces to access the Web site"
3) Navigate to Applications-- > Application Security -- Authentication Providers
4) Choose the appropriate zone and click on that
5) Choose "YES" for Enable Client Integration
It did the trick and after that am able to connect to the portal with SPD without any issues.
************************************************************************************************
Tuesday, 1 December 2009
Remove Inactive Accounts from MOSS
A common problem which we regularly encounter in MOSS Intra-Net websites. "Importing the profiles from Corporate Active Directory". As the people move in and out, the active directory will be updated and modified continuously so as MOSS Profiles. And when we search for the people using MOSS search, it looks awkward if we are still showing inactive accounts ie, details of the people who have moved out of our organisations. So in order to get the active users from LDAP, we need to configure the following filter
(&(objectCategory=person)(objectClass=user)( !(userAccountControl:1.2.840.113556.1.4.803:=2)))
Steps for this:
1) Log into Central Administration --Shared Services Provider Application.
2) Click on Userprofiles and properties.
3) Click on View Import Connections to edit them (http://[SharedServices:Port]/ssp/admin/_layouts/EditDSServer.aspx?dn=xxxx)
4) Locate user Filter text field and then enter the following line:
(&(objectCategory=person)(objectClass=user)( !(userAccountControl:1.2.840.113556.1.4.803:=2)))
Now let us see what is the userAccountControl
userAccountControl:1.2.840.113556.1.4.803 specifies the user control to be queried against LDAP objects to get the field values which has value of 2 (bit value)-- means Disabled Accounts. As we are specifying ! (not) before, means Do not get the Inactive accounts.
Ampersand & before the variables means we are joining the different conditions with AND clause.
To specify more UserAccountControl values, refer this Link : http://msdn.microsoft.com/en-us/library/aa772300(VS.85).aspx;
5)Click on Start Full Import
6)As we have included the filter for not importing Inactive Accounts, we can see the total count of Inactive profiles and Active Profiles in http://[SSP:Port]/ssp/admin/_layouts/ProfMngr.aspx?ConsoleView=Active
7) Select the Inactive Profiles in the drop down and then select all of them (if they are any), and delete them from that View.(or doing a full import 3 times would delete inactive profiles)
8)Try to import again and see that this time no Inactive profiles are shown.
9)we can even delete these profiles from MOSS databases, but I would prefer to comply with MOSS strict recommendation of NOT TOUCHING DB.
10)After confirming the profiles, navigate to search administration in SSP
11)Timer jobs would have quick synchronisation jobs running to sync the profile details to portal.
12)Reset the crawled content and perform a full search.
I will add more for specifying more attributes to this LDAP filter. As the requirements are unique for each corporate.
Adding more attributes is more interesting thing for this LDAP Filters.
1) (&(K1)(K2)(K3)) -- this means join the conditions in brackets with AND operator
2) (|(K1)(K2)(K3)) --- obviously joining with OR operator.
3) Now the combination of them
(|(&(K1)(K2)(K3))(&(K4)(K5)))
means (K1 AND K2 AND K3) OR (K4 AND K5)
More information on this is available at MSDN Location
Details of available LDAP Attributes
(&(objectCategory=person)(objectClass=user)( !(userAccountControl:1.2.840.113556.1.4.803:=2)))
Steps for this:
1) Log into Central Administration --Shared Services Provider Application.
2) Click on Userprofiles and properties.
3) Click on View Import Connections to edit them (http://[SharedServices:Port]/ssp/admin/_layouts/EditDSServer.aspx?dn=xxxx)
4) Locate user Filter text field and then enter the following line:
(&(objectCategory=person)(objectClass=user)( !(userAccountControl:1.2.840.113556.1.4.803:=2)))
Now let us see what is the userAccountControl
userAccountControl:1.2.840.113556.1.4.803 specifies the user control to be queried against LDAP objects to get the field values which has value of 2 (bit value)-- means Disabled Accounts. As we are specifying ! (not) before, means Do not get the Inactive accounts.
Ampersand & before the variables means we are joining the different conditions with AND clause.
To specify more UserAccountControl values, refer this Link : http://msdn.microsoft.com/en-us/library/aa772300(VS.85).aspx;
5)Click on Start Full Import
6)As we have included the filter for not importing Inactive Accounts, we can see the total count of Inactive profiles and Active Profiles in http://[SSP:Port]/ssp/admin/_layouts/ProfMngr.aspx?ConsoleView=Active
7) Select the Inactive Profiles in the drop down and then select all of them (if they are any), and delete them from that View.(or doing a full import 3 times would delete inactive profiles)
8)Try to import again and see that this time no Inactive profiles are shown.
9)we can even delete these profiles from MOSS databases, but I would prefer to comply with MOSS strict recommendation of NOT TOUCHING DB.
10)After confirming the profiles, navigate to search administration in SSP
11)Timer jobs would have quick synchronisation jobs running to sync the profile details to portal.
12)Reset the crawled content and perform a full search.
Adding more attributes is more interesting thing for this LDAP Filters.
1) (&(K1)(K2)(K3)) -- this means join the conditions in brackets with AND operator
2) (|(K1)(K2)(K3)) --- obviously joining with OR operator.
3) Now the combination of them
(|(&(K1)(K2)(K3))(&(K4)(K5)))
means (K1 AND K2 AND K3) OR (K4 AND K5)
More information on this is available at MSDN Location
Details of available LDAP Attributes
Subscribe to:
Posts (Atom)